
- Keep feet dry, keep socks smooth, and reduce friction before it becomes a hot spot.
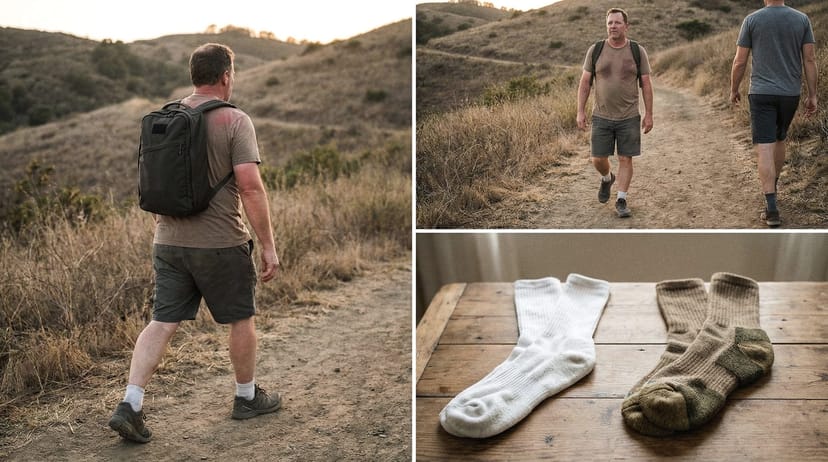
- Use merino or synthetic socks. Avoid cotton for loaded walking.
- Pre-tape known hot spots before long rucks, not after pain starts.
- Break in shoes with short loaded walks before using them on longer distances.
The four-item foot-care kit
The cheapest, most-effective blister prevention is a kit you keep packed and don't think about. Four items, total under $80, every one of them recommended by the cadre + endurance-rucker network we cross-checked this guide against.
| Priority | Item | Why this one |
|---|---|---|
| 1 | Darn Tough Light Hiker Micro Crew socks ($25) | Merino, lifetime warranty - mail back any hole, they replace. Cheaper-per-year than every competitor we benchmarked. |
| 2 | Leukotape P Athletic Tape ($10) | Gold standard for pre-taping hot spots. Lipman et al. (2014) RCT showed paper tape reduced blister incidence in distance walking. |
| 3 | Body Glide Original Anti-Chafe Balm ($10) | Apply BEFORE the ruck, not after. Reduces friction at sock-skin interface. |
| 4 | A real rucking shoe (e.g., Salomon XA Pro 3D V9 GTX, $170) | Aggressive Contagrip outsole, GORE-TEX waterproofing, 10mm drop. Stable enough for ruck-with-coupons. |
The Blister Problem (And Why It's Preventable)
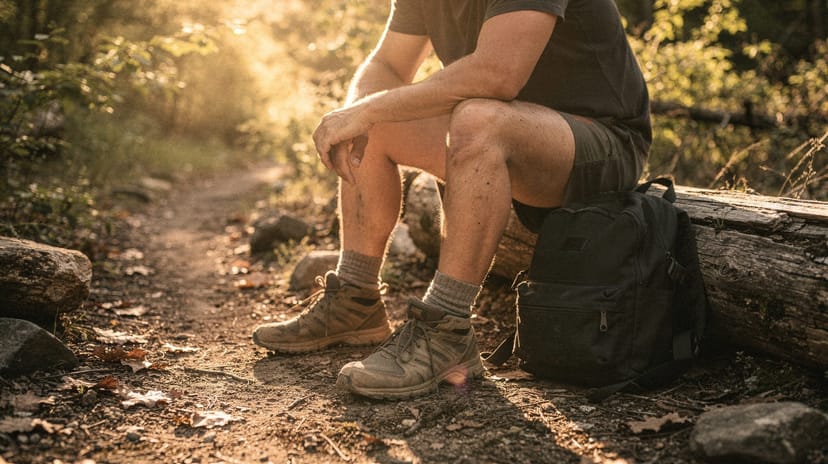
Blisters are the most common complaint we hear from new ruckers - and the #1 reason people quit before they finish their first month. A painful blister on mile 3 of a 5-mile ruck can turn a fun outing into absolute misery. The frustrating part? They're almost entirely preventable.
The good news: you don't need luck or tougher skin. You need a system. We researched foot care strategies across hundreds of community rucking reports, event-ruck packing lists, and sports medicine sources, and the strategies that work share a common theme - they eliminate the conditions that create blisters in the first place. This guide breaks down exactly what those conditions are, and how to defend against all of them.
Your feet are about to carry 20-50+ pounds of gear for hours. They deserve more than hope. They deserve a plan.
- 01
Lipman and colleagues found that pre-applied paper tape reduced foot blister incidence in an endurance-distance randomized prevention trial.
- 02
Friction Blisters of the Feet reviews current prevention strategies and keeps the focus on reducing friction, pressure, and interface problems rather than treating blisters after they form.
- 03
Sock-skin friction research links moisture, normal force, and repeated impact cycles with friction blister risk. That is why socks, fit, and early hot-spot management matter together.
Why Rucking Creates Blisters (The Friction + Moisture + Heat Triangle)

Here's the blister formation mechanics: a blister forms when the outermost layer of skin (the epidermis) separates from the layer beneath it (the dermis), creating a fluid-filled pocket. This happens when three conditions align: friction, moisture, and heat. Eliminate any one and you're safe.
Rucking is a blister factory because it creates all three simultaneously.

Friction comes from the combination of weight (your body + the ruck) creating downward pressure, and micro-movements of your foot sliding inside the shoe. When you're carrying 35 pounds, that friction force is magnified. Your foot doesn't just land; it compresses into the shoe with each step, then tries to adjust inside the shoe to find stability - that's where shear forces come in. Shear is particularly brutal because it's not just pressure; it's pressure combined with sideways movement.
Moisture is sweat. Your feet sweat more than almost any other body part - they have the highest concentration of sweat glands. When a 5-mile ruck happens on a humid day or in a shoe that doesn't breathe, your foot becomes essentially a moisture chamber. Wet skin is weaker skin. Wet skin also loses its structural integrity, becoming more susceptible to tearing under pressure.
Heat accelerates all of the above. Friction + moisture + heat = blister formation at 2-3x the speed of any one factor alone.
Military research is clear on this: the U.S. Army reports 30-40% blister incidence among soldiers on ruck marches, even with issued footwear and extensive field experience. The Army's conclusion? Blister prevention isn't about toughness - it's about system design. Prevention beats treatment every single time.
Rucking specifically amplifies this risk compared to regular hiking or walking because:
- The load is distributed across your entire body, with a significant portion borne by your feet
- Rucking typically happens at a faster pace than casual hiking, increasing friction frequency
- You're often covering longer distances without elevation change (which means constant horizontal friction, not vertical climbing)
The solution isn't to accept blisters as a cost of entry. It's to break the friction + moisture + heat triangle at every possible point.
The Sock System: Your First Line of Defense
If there's one thing that separates ruckers who get blisters from those who don't, it's socks. Socks aren't an afterthought. Socks are your first line of defense.
The cotton myth: Cotton is the worst possible choice for rucking. Cotton absorbs water, holds moisture against your skin, and loses all structural integrity when wet. If you wear cotton, you're essentially guaranteed blisters on anything longer than 3 miles. Stop wearing cotton socks immediately.
Your options:
- Merino wool - the gold standard. Merino regulates temperature, wicks moisture, resists odor, and maintains cushioning even when wet. It feels soft (not itchy like traditional wool). Merino socks cost $15-25 per pair but last 2-3 years of regular use.
- Synthetic blends (polyester, acrylic, nylon) - excellent second choice if cost is a concern. Look for brands that blend synthetics with a small percentage of merino (70/30 synthetic-merino splits are common). These wick well and dry faster than 100% merino.
- Bamboo viscose blends - decent, though not as durable as merino for high-friction activities.
The sock layering system: If you're prone to blisters, use a two-layer sock strategy. Wear thin merino liner socks (like Smart Wool PhD Ultralight) under a thicker merino or synthetic-merino blend sock. The inner layer slides against the shoe; the outer layer provides cushioning. This dramatically reduces hot spots on your toes and heel because friction happens between the sock layers, not between your skin and shoe.
Sock thickness: Merino comes in ultralight, lightweight, midweight, and heavyweight. For rucking:
- Ultralight merino: Good for shorter rucks (under 5 miles), minimal cushioning
- Lightweight merino: The versatile choice. Works for most rucking distances.
- Midweight merino: Best for longer rucks (10+ miles) and if you have naturally thin soles
- Heavyweight: Overkill for most ruckers, though some prefer the extra padding
Start with lightweight. You want enough cushioning to absorb impact without creating so much bulk that your shoe fit changes.
Brands to consider: What matters is fiber content - merino wool or synthetic blends, 50%+ of the blend. Our recommendation:

American-made, unconditional lifetime warranty. Merino wool blend with just enough cushion for rucking without adding bulk. The de facto standard for blister prevention.

Footwear Fit: How Rucking Changes the Rules
You think you know how to fit shoes. You probably do - for regular walking or running. Rucking changes the equation because your feet aren't static inside the shoe. Under load, your feet swell (sometimes a full half-size larger), they slide forward in the shoe during downhills, and they need a wider toe box to accommodate natural spreading under pressure.
The break-in protocol:
- Wear new rucking shoes for regular walking first - 2-3 weeks of casual wear
- Then: one short ruck (2-3 miles) to assess fit under load
- Then: gradual progression to longer distances
- Don't wear brand-new shoes on a 10-mile ruck. This is the #1 blister mistake we see.
Fit rules specific to rucking:
Heel lock: Your heel should not slip. When you're carrying weight, any heel movement creates friction with each step. Lace snug at the ankle. A good test: with the shoe on but unlaced, you should barely be able to lift your heel out. Then lace it snugly - not painfully, but with noticeable tension.
Toe box width: You need room for your toes to splay naturally under load. The "thumb width rule": when laced and wearing rucking socks, you should be able to barely fit your thumb between your longest toe and the shoe's end. Not half a thumb - one full thumb. Your toes will swell on longer rucks.
Midfoot pressure: The arch shouldn't feel like it's being crushed, but it should feel supported. You're looking for snug, not painful.
Evidence suggests that shoes fitted for regular walking are often too tight in the toe box for rucking. If you're between sizes, go up half a size for rucking shoes. Your toes will thank you.
For detailed shoe selection guidance including options for different terrain types and foot shapes, try the Salomon XA Pro 3D or see our full best rucking shoes by terrain guide. If you're just starting out and want a complete beginner setup with tested shoes and gear, check out our budget rucking starter kit.

Pre-Taping and Hot Spot Prevention: Stop Blisters Before They Start
A blister doesn't appear out of nowhere on mile 5. It starts as a "hot spot" - a red, tender area where friction is building. The magic of pre-taping is this: if you tape a hot spot before it becomes a blister, you'll never develop the blister.
Leukotape P is the gold standard. It's what ultradistance hikers, the military, and professional athletes use. It sticks like crazy, it moves with your foot, and it doesn't peel off mid-ruck. A roll costs $6-8 and lasts months. It's the best $8 you'll spend on blister prevention.
Common hot spot locations:
- Inside heel (where shoe rubs during push-off)
- Heel-to-ball transition (top of foot, around your arch)
- Ball of foot (under the metatarsal heads - those bumpy areas under your toes)
- Pinky toe side (outer edge of your foot)
- Between toes (if your toes are crowded)
The pre-taping strategy:
- Before you leave your house, identify where you personally get hot spots. (Track this over 2-3 rucks if you're new.)
- Clean and dry those areas completely.
- Cut a piece of Leukotape and round the corners (prevents peeling).
- Apply directly to skin, press firmly for 30 seconds.
- Wear socks over the tape.
The blister kit you carry: Pack this in a small ziplock for rucks over 5 miles: - 3-4 pre-cut pieces of Leukotape (rounded corners, already cut) - 2-3 moleskin pieces - Small packet of body glide or anti-chafe balm - Blister needle (sterilized) if you get a blister mid-ruck and need to drain it - Gauze pad (2x2) In a pinch, you can apply Leukotape mid-ruck over a hot spot and continue. It's that effective.
Alternative products:
- Moleskin: Cheaper than Leukotape, but less durable and peels off more easily. Use if you can't find Leukotape.
- Body Glide Original: Reduces friction proactively across your entire foot or at known blister hotspots. Apply before each ruck on areas prone to chafing. It's cheaper than tape and works best as a prevention layer - the gold standard for ruckers who want to skip blisters entirely.
Lacing Techniques: Fine-Tuning Your Shoe Performance
You probably lace your shoes the same way everyone does. Two techniques can dramatically reduce heel slip and pressure points:
Heel lock lacing (if you have heel slip issues):
- Lace your shoe normally through the toe box
- At the top two eyelets, cross the laces as usual
- Before tightening, thread each lace through the loop created by the lace on the opposite side (this creates a small "lock" at the heel)
- Pull snug and tie
This keeps your heel anchored without restricting blood flow. Takes 10 seconds to learn.
Window lacing (if you have pressure points on top of your foot): Instead of crossing the laces at every eyelet, skip certain eyelets to create a "window" where that section of shoe isn't pulling down. This reduces pressure on the ball of your foot or arch if that's where you get hot spots.
Most ruckers don't need anything fancy - standard lacing with a snug heel lock is enough. Only experiment if you're dealing with specific hot spots that tape isn't solving. If lacing techniques alone don't solve your issues, the shoe itself may not be the right fit - try the Salomon XA Pro 3D or browse our best rucking shoes by terrain guide to find a better match for your foot shape.
Mid-Ruck Foot Management: Addressing Problems Before They Escalate
Even with perfect socks and taping, you might feel the beginnings of a hot spot mid-ruck. The key question: do you stop and address it, or push through?
Stop and address it. This isn't toughness. This is efficiency. Five minutes addressing a hot spot now beats an hour-long blister that ruins the rest of your ruck.
What to do if you feel a hot spot forming:
- Stop and find shade or a safe spot to sit
- Remove your shoe and sock
- Assess: is the skin red and tender, or is there actual fluid (early blister)?
- If it's just red: clean the area, apply Leukotape, and continue
- If there's fluid: apply Leukotape first (don't lance it yet unless it's about to burst), replace your socks, and monitor
- If the blister is about to burst and is causing pain with every step, you can lance it mid-ruck (see the treatment section below)
Time spent preventing blisters now saves you from 2-3 days of painful walking later.
Treatment: If You Do Get a Blister
Despite your best efforts, you might develop a blister. Here's what to do.
Should you drain it? It depends on size and pain level:
- Small blisters (smaller than a pencil eraser) with no pain: leave it alone. Let it reabsorb.
- Medium blisters (larger than a pencil eraser) with pain: drain it to reduce pressure and pain.
- Large, painful blisters: definitely drain.
How to drain safely:
- Wash your hands
- Clean the blister area with soap and water
- Sterilize a needle (hold over a flame for a few seconds, or use alcohol wipe)
- Poke a small hole at the edge of the blister (not the center)
- Gently press fluid out (don't squeeze hard)
- DO NOT remove the skin roof of the blister - that skin protects the wound
- Apply antibiotic ointment (Neosporin) and a sterile bandage
- Change the bandage daily and keep it clean
Dressing options:
- Hydrocolloid bandages (the fancy blister bandages): These absorb fluid and speed healing. They're pricey ($1-2 per bandage) but worth it for serious blisters.
- Gauze + antibiotic ointment: The classic approach. Change daily.
- Leukotape over the blister: Works, but less comfortable than a proper dressing.
When to see a doctor: - Blister shows signs of infection: increasing redness, warmth, pus (yellow/green fluid), red streaks radiating from the blister, or fever - Blister is extremely large (larger than a quarter) and extremely painful - Blister is on a joint and completely prevents movement - You have diabetes or circulation issues (you're at higher risk for complications) Infection is rare, but it can happen. Don't ignore signs.
Post-Ruck Foot Recovery: Setting Up for Your Next Session
What you do in the 2 hours after a ruck sets the stage for how your feet feel for the next 3 days.
Immediate post-ruck (first 30 minutes):
- Remove your shoes and socks immediately
- Wash your feet with soap and water (gets rid of salt and sweat) - also wash off any remaining Body Glide Original to prevent buildup
- Dry completely between the toes (moisture = infection risk)
- If you have any blisters, apply antibiotic ointment and a fresh bandage
Within 1-2 hours:
- Elevate your feet above heart level for 15-20 minutes (reduces swelling)
- Optional: ice your feet for 10-15 minutes if they're sore (not necessary, but feels good)
Evening routine:
- Soak your feet in warm Epsom salt water for 15-20 minutes (magnesium sulfate reduces inflammation and softens calluses)
- Gently towel dry
- Check for any new blisters or issues
- Trim toenails straight across, not curved (curved trimming can cause ingrown nails)
- Leave toenail edges slightly long (trim short causes problems)
Sock and gear care:
- Wash your rucking socks after every ruck (don't let sweat dry in the fabric)
- Air-dry your shoes (don't use heat - it can damage the glue)
- If your shoes smell, sprinkle baking soda inside overnight

Common Mistakes That Lead to Blisters
You now know the system. Here are the traps to avoid:
Mistake #1: Wearing new shoes on a long ruck. Your feet need 2-3 weeks to adapt to new footwear. The shoe materials soften, the insole compresses to your foot shape, and your feet adjust to the new geometry. Do this gradually.
Mistake #2: Cotton socks. If you're using cotton, you're pre-blister. Switch to merino or synthetic today. This single change solves blisters for about 60% of people.
Mistake #3: Ignoring hot spots. A hot spot is your early warning system. By the time you have a blister, it's too late. Tape hot spots immediately.
Mistake #4: Skipping the break-in protocol. Just because you "know" shoe sizing doesn't mean you know your rucking shoe size. Your feet swell under load. Test under load before committing to a long ruck.
Mistake #5: Wrong sock thickness. Lightweight merino is usually the sweet spot. If you wear ultralight socks and your feet hurt, move up a thickness. If you wear heavyweight and your feet feel cramped, move down.
Mistake #6: Lacing too loose. Heel slip = friction = blisters. If you're not sure your shoe is snug enough, it probably isn't.
Mistake #7: Cutting toenails too short. Short toenails can curl into the nail bed or create sharp edges that dig into adjacent toes. Trim them straight across, just at the edge of your toe. Slightly long is better than slightly short.
Mistake #8: Not drying feet immediately after your ruck. Wet skin is weak skin. Dry and air-dry your feet immediately post-ruck.
The Bottom Line
Blisters aren't inevitable. They're not a rite of passage. They're a sign that one or more of these systems isn't working: your socks, your shoe fit, your taping, or your foot hygiene.
You now have all the pieces: merino wool socks, proper shoe fit, Leukotape for hot spots, lacing techniques, and a post-ruck recovery routine. Start with socks (the biggest impact) and build from there.
Your feet are capable of carrying you 10, 20, even 30+ miles. Give them the system they deserve, and they won't let you down.
Related Articles
- Best Rucking Socks: Blister Prevention Under Load - the seven socks that actually work at 30+ lb, plus the two-sock system for events
- Best Rucking Shoes by Terrain - footwear selection guide; try the Salomon XA Pro 3D or Darn Tough socks
- Best Shoes for Rucking on Pavement - max-cushion and stability picks for concrete miles
- Rucking Plantar Fasciitis - prevention and treatment for heel and arch pain
- Rucking Prehab Routine - strengthen feet and ankles before they get injured
- Rucking Injury Prevention Pillar - full injury prevention framework
- Hiking unloaded instead? Our sister site Kit Authority covers blister prevention for hikers - same physiology, no pack weight
- Rucking Form Guide - correct movement patterns reduce foot stress
Frequently Asked Questions
Cotton athletic socks will cause blisters even on short rucks once you add weight. The article explains that cotton absorbs moisture and loses structural integrity when wet, creating friction against your skin. Switch to merino wool or synthetic blend socks immediately, even for 2-mile rucks.
Yes, typically half a size up from your running shoes. The article notes that feet swell under load and need extra toe box room for natural spreading. Use the thumb-width test: you should barely fit your thumb between your longest toe and shoe end when wearing rucking socks.
Do 2-3 short rucks first and track where you feel hot spots or tenderness. The article lists common locations (inside heel, ball of foot, pinky toe side), but your personal hot spots depend on your foot shape and gait. Mark these areas and pre-tape with Leukotape before longer rucks.
The article recommends blister kits for rucks over 5 miles, but if you're prone to blisters or breaking in new gear, carry pre-cut Leukotape pieces even on shorter rucks. Five minutes addressing a hot spot mid-ruck beats days of painful walking afterward.
Better socks solve blisters for about 60% of people according to the article, but the remaining 40% need the full system. If merino wool socks alone don't work, add proper shoe fit, pre-taping known hot spots, and heel-lock lacing. Each element breaks part of the friction-moisture-heat triangle.
The article's guidance is size plus pain level. Large blisters (bigger than a quarter) that are painful should be drained, but if it's not causing pain with each step, you can leave it alone to reabsorb naturally. Only drain if the pressure is affecting your ability to walk normally.
The article recommends 2-3 weeks of casual wear first, then one short ruck (2-3 miles) to test fit under load, then gradual progression to longer distances. Don't wear brand-new shoes on a 10-mile ruck, even if they feel comfortable during regular walking.


