
- Rucking is not automatically bad for knees. Fast load jumps are the problem.
- Front knee pain usually points to patellofemoral stress or tendon load.
- Outside knee pain usually points upstream to hip control and glute medius weakness.
- Deload first, strengthen the weak link, then rebuild distance or load one variable at a time.
Is rucking bad for your knees?
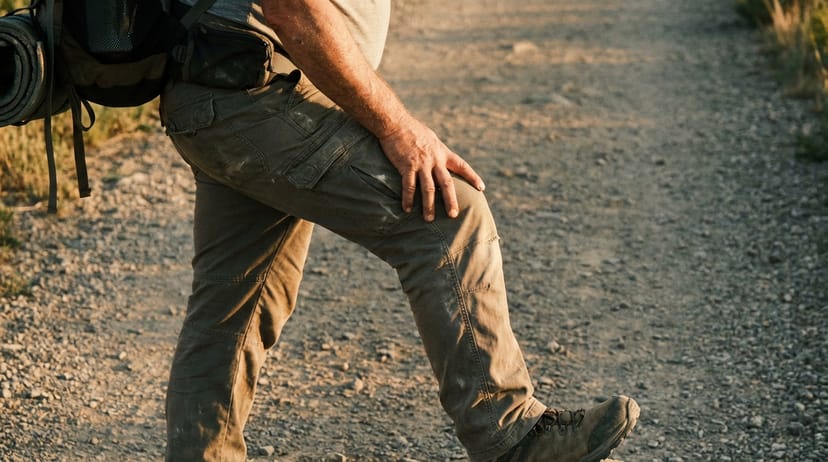
Short answer: no - not when load and progression are appropriate. This is the first thing you need to know because it affects your entire mindset going forward.
Rucking is actually lower-impact than running when measured per mile. In running, you're launching your bodyweight with each stride, creating ground reaction forces of 2.5 to 3 times your bodyweight. In rucking, you're adding weight to your frame and walking - the peak forces are lower and the stride is more stable. Your knee isn't being yanked upward on every step.
The reason so many ruckers report knee pain isn't because the activity itself is harmful. It's because most training errors boil down to two mistakes: doing too much too fast, or training with obvious weaknesses in the muscles and movement patterns that support the knee joint.
Loaded walking can actually strengthen the structures around the knee - your quads, glutes, and tendons adapt to bearing weight. But this adaptation only works if the stimulus is progressive and paired with adequate recovery and mobility. Jump into 20-mile rucks carrying 40 pounds when you've never rucked before, and yes, your knees will complain. That's not a fault of rucking; that's overtraining.
One important caveat: if you have a pre-existing knee condition like a torn meniscus, severe arthritis, or a history of ACL injury, you need medical evaluation before starting a rucking program. Rucking can be rehabilitative for many conditions, but it's not universal. Talk to a sports medicine doctor first if you're uncertain.
- 01
Breda and colleagues compared progressive tendon-loading exercise with eccentric therapy for patellar tendinopathy. The useful takeaway for ruckers is progressive loading, not complete avoidance.
- 02
Clinical Management of Patellar Tendinopathy identifies load management plus progressive tendon loading as the most consistent treatment direction for patellar tendon pain.
- 03
Birrell, Hooper, and Haslam showed that added load increases ground reaction forces. That supports the practical rule: when pain appears, reduce load and distance before adding more work.

Identify your knee pain type
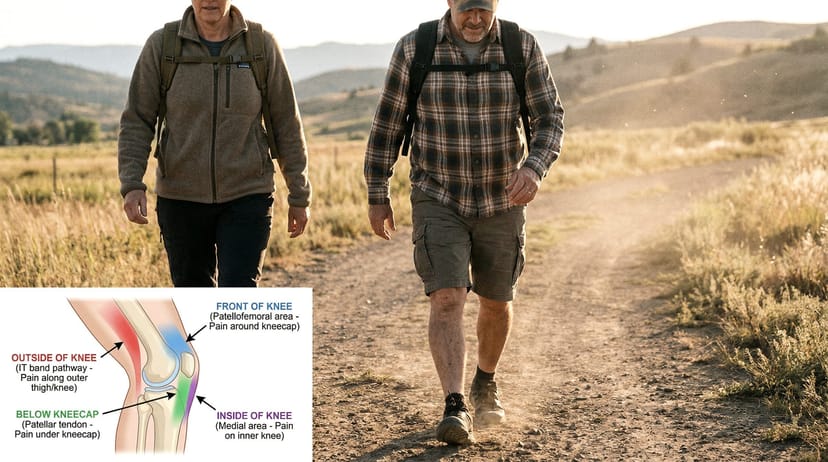
Before you can fix knee pain, you need to know what type you're dealing with. The location and quality of pain tells you which structures are stressed and which muscles are likely weak.
| Pain location | What it feels like | Likely weak link | First move |
|---|---|---|---|
| Front / under the kneecap | Dull ache, worse on stairs and downhill | Weak VMO / quads | Deload + VMO strengthening |
| Outside of the knee (IT band) | Burning or rubbing on the outer knee | Weak glute medius / hip abductors | Hip abductor strengthening |
| Below the kneecap | Ache and tenderness just below the kneecap, worse downhill | Overloaded patellar tendon | Eccentric loading, cut downhill |
| Inside of the knee (medial) | Pain along the inner joint line | Foot pronation / weak adductors | Arch support + adductor work |
Front of knee (patellofemoral)
This is the most common rucking knee pain. You'll feel it under or around the kneecap, usually a dull ache that gets worse with stairs, downhill, or long rucks. The pain might feel like it's coming from directly behind the kneecap or along the inside edge of it.
This typically happens when your quads - specifically the vastus medialis obliquus (VMO), the teardrop-shaped muscle on the inner thigh - aren't strong enough to track your kneecap properly. Add load to that, and the kneecap gets pulled slightly out of alignment with each step. Common culprits include desk jobs (weak quads in general), overstriding (your leg extends too far forward, increasing pressure on the kneecap), going too heavy too fast, or poor quality shoes that don't stabilize your foot.
Outside of knee (IT band syndrome)
You'll feel a burning or rubbing sensation on the outside of the knee, usually developing gradually over the course of a ruck or appearing the day after. Some people describe it as tightness on the lateral knee.
The IT band doesn't actually get "tight" in a way you can stretch away - it's a fascial structure that attaches to your hip and runs down the outside of your thigh. IT band pain in rucking usually means your hip abductors (the muscles that lift your leg out to the side, mainly the gluteus medius) are weak or under-activated. Your knee compensates by caving inward with each step, creating friction. Sudden volume increases, weak hip stabilizers, and tight hips all contribute.
Below the kneecap (patellar tendinopathy)
Pain in the tendon that connects your kneecap to your tibia (shinbone) - you'll feel it directly below the kneecap, often aching and tender to the touch. It typically gets worse going downhill and might feel better once you warm up. This is the classic overuse pattern: your quads and patellar tendon are being loaded faster than they can adapt.
Heavy loads, lots of downhill terrain, and rapid increases in volume are the primary drivers. Your tendons need time to strengthen, and they adapt more slowly than muscles. This injury is common in people jumping into loaded walks after a period of inactivity, or in those who add significant mileage without proper strength work.
Inside of knee (medial)
Pain along the inside of the knee joint or along the medial joint line. This is less common in rucking than the other types, but when it appears, it usually signals foot pronation (rolling inward) under the added load, weak adductor muscles (inner thigh), or dynamic knee valgus - your knee collapsing inward under load.
This one requires attention to foot mechanics and arch support, because if your foot is unstable, your knee has to compensate. Poor shoes, flat feet without support, or weak hip and adductor strength all contribute. If your current shoes fit well but your arches collapse under load, a supportive insole is the cheapest intervention in the entire load path.
The fix: a 3-phase approach
The treatment protocol for rucking knee pain isn't complicated, but it does require discipline. Your goal is not to sit in pain waiting for it to go away. Your goal is to reduce the aggravating stimulus while building the strength and movement quality that will prevent it from coming back.
Phase 1: Reduce the aggravating load (Days 1-7)
This is where most people fail. They either stop rucking entirely, or they tell themselves they'll push through it. Neither works.
Instead, reduce your ruck weight by 30 to 50 percent. If you've been carrying 30 pounds, drop to 15 or 20. Cut your distance in half. Stick to flat terrain only - no hills, no stairs. This is called a deload, and it's one of the most evidence-based interventions for overuse injuries.
Why not just rest? Because complete rest causes rapid deconditioning and often prolongs recovery. Your knee still needs movement, blood flow, and stimulus - just at a lower magnitude. You're signaling your body that you're not quitting; you're just backing off the throttle.
Most people see significant improvement in 3 to 7 days at this level. Pain should drop from a 7 or 8 out of 10 to a 3 or 4. If it doesn't, you might need additional intervention or medical evaluation.
Phase 2: Strengthen the weak links (Weeks 2-4)
While you're rucking with reduced load, you need to address the muscular imbalance that caused the pain in the first place. The specific exercises depend on your pain location.
For patellofemoral pain: Focus on quad strengthening, particularly the VMO. Wall sits (hold 30 to 60 seconds, 3 sets), terminal knee extensions (using a resistance band looped around a pole, lock your knee out against resistance, 3 sets of 15), and step-ups onto a low box (3 sets of 10 each leg). These build the VMO without the high impact of jumping or heavy loading.
For IT band syndrome: Hip abductor strengthening is your priority. Clamshells (lying on your side, keeping your feet together, raising your top knee, 3 sets of 15 each side), side-lying leg raises (lying on your side, lifting your leg straight up, 3 sets of 12 each side), and banded walks (band above knees, walking sideways 20 steps, 3 sets). Add these two to three times per week.
For patellar tendinopathy: Eccentric loading is the gold standard. Slow, single-leg squats where you lower yourself over 3 to 5 seconds on one leg and stand back up on two legs (3 sets of 6 to 8). Decline board squats (a board angled at 15 degrees, performing squats on it to reduce patellofemoral compression at depth) also work well. These train your tendon to handle deceleration forces.
For medial knee pain: Strengthen your adductors with Copenhagen squeezes (lying on your side, knees bent, squeezing a pillow or foam roller between your knees, 3 sets of 15). Also assess your footwear and consider getting your arch support evaluated.
Pair all of this with the mobility work from the Rucking Mobility Guide, especially hip flexor and calf stretches.
Phase 3: Gradual return to full loading (Weeks 4-8)
Once pain has dropped significantly and you're strong in your weak areas, you can start building back to your previous load and distance. Use the 10 percent rule: increase either weight or distance by no more than 10 percent per week.
So if you're at 15 pounds and 2 miles with zero pain, the following week you could do 16 to 17 pounds at 2 miles, or 15 pounds at 2.2 miles, but not both. Monitor your symptoms closely. Pain should stay below a 2 or 3 out of 10 during activity. If pain returns, drop back one step and spend an extra week there.
This phase usually takes 4 to 8 weeks depending on how aggressive you want to be. Most people can return to their baseline in 6 weeks if they're consistent with strength work.
Prevention going forward
Once you've cleared knee pain, the goal is never experiencing it again. This is where the payoff of prevention work becomes obvious.
Start doing a prehab routine 2 to 3 times per week. The Rucking Prehab Routine takes 15 minutes and targets the exact joints and muscles stressed by loaded walking. This should become non-negotiable, especially in the first 8 to 12 weeks of rucking.
Shorten your stride under load. This is a simple biomechanical fix. Taking smaller, quicker steps reduces the stress on your knees compared to long, powerful strides. Focus on a cadence of around 100 to 110 steps per minute, even on longer rucks.
Follow the 10 percent rule religiously. This applies whether you're building mileage or adding weight. Don't jump from 10 to 15 miles in a week. Don't go from 20 to 30 pounds. Your tendons and bones need time to adapt, and that adaptation is slow - usually 4 to 6 weeks per significant increase.
Invest in proper footwear with adequate support. Shoes designed for hiking or work boots are better than minimalist shoes or fashion sneakers. Your feet are the foundation of the load path, and if they're unstable, your knees pay the price.
The Salomon Quest 4 GTX offers full ankle support that reduces the compensations that climb up into the knee - essential if you're recovering from knee pain. For load management, proper ruck plates like the Titan Fitness ruck plate help you distribute weight properly instead of shifting loads that stress your knees.
If you're wearing a knee brace while rucking, Body Glide Original applied where the brace touches your skin eliminates the chafing that can compound discomfort during recovery rucks.
For a complete guide, see Best Rucking Shoes by Terrain.
Finally, prioritize strength training for your quads and glutes even outside of rucking. One or two lower-body strength sessions per week - squats, deadlifts, lunges, or leg press - builds capacity so that your rucking load feels less demanding on the knees. Proper footwear is also essential - shoes with adequate support prevent compensations that lead to knee pain, so check our best rucking shoes by terrain guide.
When to see a professional
Knee pain that resolves within 2 to 3 weeks with the self-treatment above doesn't need professional evaluation. But several warning signs suggest you need to see a sports medicine doctor or physical therapist.
If pain persists after 2 weeks of deloading and proper strength work, something more complex might be happening. You could have a structural issue like a meniscal tear, early arthritis, or a tendon that needs more specialized treatment.
Swelling that doesn't resolve after a few hours of rest - or swelling that comes back with each ruck - is another red flag. A little puffiness is normal; persistent fluid is not.
Locking or catching sensations (your knee feels like it's catching or getting stuck momentarily) or giving way (your knee buckles unexpectedly) suggest structural damage that won't resolve with prehab alone.
Pain at rest, especially waking-up pain, is different from pain only during activity. This usually indicates more significant inflammation or a structural problem.
Finally, if you have a history of ACL, MCL, or meniscal injuries, get cleared by a professional before starting a rucking program. Previous injuries change the equation significantly.
Current sports medicine thinking strongly favors progressive loading over complete rest for treating most tendon and patellofemoral overuse injuries. Research consistently shows that reducing load to a tolerable level and gradually building back up while strengthening the affected structures produces better outcomes than immobilization or extended rest periods.
Related reading
- Rucking prehab routine - 15-minute routine that targets the joints and muscles most stressed by loaded walking
- Best rucking shoes by terrain - shoes with proper support prevent the foot instability that causes knee compensation
- How heavy should your ruck be? - use our weight calculator before adding load; too much too fast is the #1 cause of knee injuries
- Ruck plate comparison - if you're adjusting your load, know your plate options
Frequently Asked Questions
Keep rucking but reduce your load by 30-50% and cut your distance in half for the first week. Complete rest actually slows recovery because your knee needs movement and blood flow to heal properly.
See a professional if pain persists after 2 weeks of proper deloading and strengthening, if you have swelling that doesn't resolve after rest, or if your knee locks up or gives way unexpectedly. Pain only during activity that improves with the protocol described here usually doesn't need medical intervention.
Downhill walking increases the braking forces on your quads and patellar tendon with each step, especially under load. If you have patellofemoral pain or patellar tendinopathy, avoiding hills during your recovery phase prevents aggravating these structures while they heal.
You might still be loading too aggressively during your rucks, or you may have a structural issue that needs professional evaluation. Make sure you're truly following the 10% rule for increases and that your pain stays below 2-3 out of 10 during activity.
A knee brace can provide temporary support during recovery, but it shouldn't be your primary treatment strategy. Focus on strengthening the weak muscles causing your pain rather than relying on external support long-term, as braces can create dependency without addressing root causes.
Most people can return to baseline in 4-8 weeks if they consistently follow the deloading, strengthening, and gradual progression protocol. The key is patience with the 10% rule - rushing this phase is the most common reason people re-injure their knees.
Yes - proper ruck plates that sit close to your back maintain better load distribution than loose weights that shift around. Shifting loads create uneven forces that can stress your knees, especially if you already have weakness in your stabilizing muscles.


