- Stand tall with a slight lean from the ankles, not the waist.
- Keep steps short enough that your foot lands under your hips.
- Roll heel to toe, let your arms swing, and keep breathing conversational.
- If pain shows up, check pack height and stride length before adding more load.
Why form matters more under load

When you walk without load, your body is incredibly forgiving. Sloppy mechanics, asymmetries, and compromises in your form don't matter much because the forces are low. Your body compensates and recruits muscles in ways that work around bad mechanics.
Add 20-40 pounds and everything changes. Those compensations become injury vectors. A small forward lean from your waist that's invisible when unloaded becomes chronic lower back strain when you're loaded. A slight inward collapse of your knee that barely registers on an easy walk becomes a fast track to patellofemoral pain when you're carrying weight.
Good rucking form does three things: it protects you from injury, it makes every mile more efficient (less energy wasted), and it makes rucking comfortable even on long outings. Form matters because you're telling your muscles and joints to do work they're not used to, and you're asking them to do it repeatedly.
The fundamentals are straightforward. Five key elements control 90% of rucking mechanics: posture, foot strike, stride length, arm swing, and breathing. Master these and most form issues solve themselves.
- 01
Birrell, Hooper, and Haslam, Gait & Posture (2007) found that added load increased vertical and forward-backward ground reaction forces, which is why stride control matters once a pack gets heavy.
- 02
Quesada, Mengelkoch, Hale, and Simon, Ergonomics (2000) measured step kinematics and metabolic cost across loaded simulated marching, providing the empirical basis for the "shorter stride, higher cadence" advice once pack weight goes up.
- 03
Walsh & Low - load carriage postural control and spatiotemporal gait parameters (PMC9863443, 2021) measured center-of-pressure sway and step kinematics across level and uphill loaded walking, confirming that load carriage degrades postural control - which is the empirical reason for the posture + short-stride cues below.
- 04
Knapik, Reynolds, and Harman, Military Medicine (2004) reviewed load carriage physiology, biomechanics, and medical issues in military populations. Fitness rucking usually uses lower loads, but the same load carriage mechanics apply.
The 5 fundamentals of rucking form
1. Posture: tall spine, slight forward lean
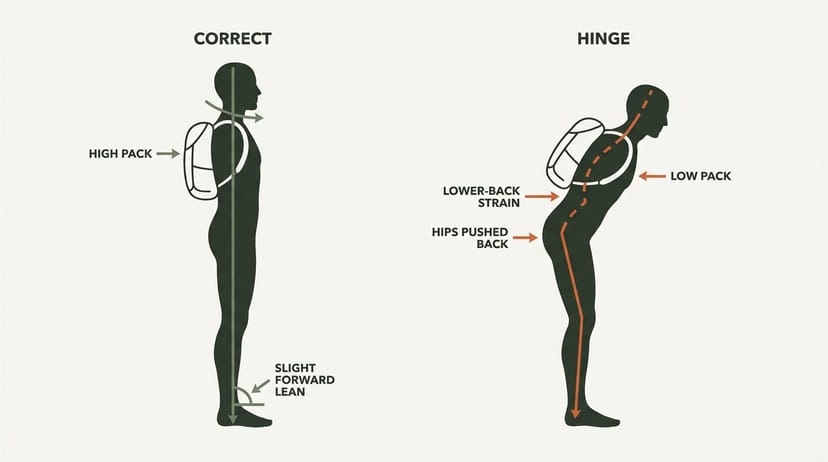
Your posture is the foundation of everything else. Stand tall as if someone is pulling the crown of your head toward the ceiling. Your eyes should look forward naturally, not up or down. Your shoulders should sit back and down - not shrugged toward your ears, which is a sign of tension.
Here's the critical part: you should lean slightly forward from the ANKLES, not from the waist. This is the most common misunderstanding. A 3-5 degree forward lean from your ankles puts your center of mass slightly ahead of your base of support, which makes walking feel more natural and efficient. But this lean should come from your ankles and lower legs, not from bending or hinging at your waist.
Your core should be engaged - think "braced, not flexed." You're not doing an isometric crunch; you're tightening your midsection slightly, as if you're about to take a punch. This keeps your spine neutral and protects your lower back.
The most common mistake is hinging at the waist, especially as fatigue sets in. As your legs get tired, your body wants to lean from the waist to reduce the work. Don't let it happen. A waist hinge combined with load is a recipe for lower back pain. Catch this by checking yourself every 5-10 minutes: Can I draw a straight line from the top of my head through my hips to my ankles? If your hips are in front of your ankles, you're hinged.
Cue: "Imagine a string pulling the top of your head toward the sky while your weight stays over your feet."
2. Foot strike: heel-to-toe roll

Your foot strike is how your foot contacts the ground. Under load, the most efficient and joint-friendly approach is a heel-to-toe roll: land with a soft heel, roll through your midfoot, and push off from your toes.
This is not the same as running. Runners often use a forefoot strike (landing on the ball of the foot) for efficiency and speed. Rucking is different. A loaded forefoot strike puts excessive stress on your metatarsals (the small bones in the ball of your foot) and your Achilles tendon. Your body isn't designed to absorb heavy load repeatedly on the forefoot while walking.
A proper heel-to-toe roll distributes the force of impact across a longer time period and over more of your foot. Your heel takes initial contact, your arch flexes slightly to absorb shock, your midfoot carries you forward, and your toes provide the final propulsive push. A shoe with a stable heel and a smooth rocker - something like the Salomon XA Pro 3D V9 GTX - makes that roll easier to feel and harder to fight under load.
Keep your feet pointed forward, not splayed outward. Toes out might feel more stable, but it's actually less efficient and can create lateral knee stress over time. Neutral foot position aligns your joints properly.
Biomechanics research on loaded walking shows that ground reaction forces increase roughly 15-25% compared to unloaded walking at the same pace. Proper heel-to-toe mechanics help distribute that force across the gait cycle rather than concentrating it at impact.
3. Stride length: shorter than you think

Overstriding is the number-one form mistake in rucking. Most new ruckers try to maintain their normal walking stride while under load. This is almost always too long.
Here's what happens with an overstrided gait: your foot lands far in front of your body's center of mass, which creates a braking force with every step. You're essentially pushing the ground backward to slow yourself down. This braking force increases impact on your joints, especially your knees. It also requires more muscular effort to overcome. You're working harder and getting less distance - the opposite of what you want.
Under load, your stride naturally shortens. Let it. A shorter stride under load is more efficient, creates less braking force, increases stability, and reduces stress on your knees. The cue is "Quick feet, not long feet." Think about cadence (steps per minute) rather than stride length. Aim for around 120 steps per minute, which is comfortable and efficient under load.
This is one of those things you won't feel when you're doing it right, but you'll feel it immediately in your knees if you're overstriding. Pay attention to your foot landing under your hips, not in front of them.
4. Arm swing: natural and relaxed
Your arms should swing naturally at your sides, helping to balance your motion and maintain rhythm. They're not there for propulsion; they're there for balance and efficiency.
The biggest mistake here is gripping the shoulder straps of your pack. This is a natural instinct - you feel unbalanced or worried the pack will slip, so you grab the straps. But gripping restricts your arm swing, which actually makes you less balanced. It also creates tension in your shoulders and neck, leading to upper back pain. Worse, it restricts blood flow to your hands, which can cause numbness and tingling.
The fix is to loosen your shoulder straps appropriately and adjust your pack so it fits properly. Once it fits right, your arms hang freely at your sides, swinging naturally. This actually improves stability and comfort. A well-fitted pack like the GORUCK GR1 or Mystery Ranch 2 Day Assault with proper strap design makes all the difference for load transfer.
Some people pump their arms aggressively while rucking, thinking it helps them move faster. It doesn't - it just wastes energy. Your arm swing should be relaxed and natural, the same as an unloaded walk. If you find your hands going numb despite loose straps, experiment with pack height and chest strap position. Often, numb hands indicate the pack is riding too high or the straps are pinching a nerve.
5. Breathing: conversational pace
Your breathing pattern tells you whether you're working at the right intensity. For steady-state rucking (the kind that makes up most of your training), you should be able to hold a conversation. If you're gasping or breathing hard, you're going too fast for the load, or your load is too heavy for your current fitness.
Nasal breathing is ideal for Zone 2 rucking (the aerobic base-building intensity). Breathing through your nose naturally limits your pace to a sustainable level and engages your diaphragm rather than your chest. Your diaphragm (the muscle under your rib cage) is more efficient for breathing than your intercostal muscles (between your ribs).
Diaphragmatic breathing is the technical name for belly breathing. When you inhale, your belly expands outward; your chest stays relatively still. When you exhale, your belly contracts. This is how efficient breathing works. Many people chest-breathe instead, which is shallower and less efficient.
A practical tip for rhythm: try a 3-step inhale and 2-step exhale pattern. That means you breathe in for three steps, breathe out for two steps. This creates a natural rhythm that syncs with your walking and prevents you from holding your breath or breathing too rapidly.
If you find yourself breathing hard, the fix is simple: slow down or reduce your load. There's no value in pushing through to harder breathing when rucking. You should be able to complete every ruck comfortably, breathing steadily. Hard breathing means you've changed the stimulus - it's no longer rucking, it's speed hiking or training for a different energy system.
The 5 most common rucking form mistakes

These are the mistakes we see repeatedly, and they're all fixable.
The Ruck Authority form diagnostic
Use this table when something starts to hurt mid-ruck. Most form problems show up as a predictable pain pattern.
| Symptom | Likely form issue | Fast fix |
|---|---|---|
| Low back tightness | Leaning from the waist or pack riding low | Stand tall, lean from ankles, tighten pack higher |
| Knee ache | Overstriding or braking on downhills | Shorten stride, increase cadence, slow descents |
| Neck/upper trap pain | Shoulders shrugged or straps too tight | Drop shoulders, loosen shoulder straps, use sternum strap |
| Numb hands | Gripping straps or nerve compression at shoulder | Let arms swing, adjust strap tension, move chest strap |
| Shin splints | Too much pace, mileage, or heel-slamming | Slow down, shorten stride, roll heel-to-toe |
| Hot spots/blisters | Foot sliding or overstriding | Lock laces, use merino socks like Darn Tough Light Hiker, shorten step length |
Not sure if your pain pattern is form or something else? Run a quick assessment:
Mistake 1: Leaning too far forward from the waist
The cause: A heavy pack creates a backward-pulling force on your body. Instinctively, you counter this by leaning forward from the waist. As fatigue sets in, your core engagement fades and this forward lean gets exaggerated. You also might naturally hinge forward if you're tired or if your pack doesn't fit well.
The consequence: Lower back strain. A waist hinge under load creates asymmetrical stress on your lumbar spine. The muscles on one side of your spine overwork while others underwork. This leads to chronic lower back tightness, pain, and potentially acute injury if it gets bad enough.
The fix: Tighten your pack's hip belt and shoulder straps so the load sits closer to your body. A well-fitted pack should feel like an extension of you, not a separate thing pulling you backward. Reduce your load if the pain is acute. Engage your core actively - do core work off the ruck (planks, dead bugs, bird dogs) to build the strength to hold good posture under load. Every 10 minutes during a ruck, do a posture check: eyes forward, shoulders back, slight lean from ankles only.
Mistake 2: Overstriding
The cause: Most ruckers try to maintain their natural unloaded walking pace and stride length. Unloaded, your stride is longer because there's no load pushing down on your joints. Under load, you need to shorten it. Many people either don't realize this or don't want to slow down.
The consequence: Knee pain and shin splints. An overstrided gait increases braking forces on your knees with every step. Your knees are designed to absorb some impact, but repeated braking stress exceeds their tolerance. Shin splints (pain along the tibia bone) often result from the increased muscular effort required to overcome braking forces.
The fix: Accept that rucking is slower than unloaded walking. Aim for 120 steps per minute (you can count for 15 seconds and multiply by 4 to check). Focus on cadence, not speed. Your pace will naturally be 2.5-3.0 mph, and that's correct. Short, quick steps under load is the right approach. If you're naturally a fast walker, this mental shift takes practice.
Mistake 3: Rounded shoulders
The cause: Heavy shoulder straps create downward pull on your shoulders. Your chest muscles are often tight from modern life (sitting at desks), which pulls your shoulders forward and rounds them. As a ruck gets longer, fatigue causes your posture to collapse into a rounded shoulder position.
The consequence: Upper back pain and restricted breathing. Rounded shoulders limit your breathing efficiency and create tension in your upper back and neck. The rhomboid and trapezius muscles (upper back) have to work harder to resist the forward-rounded position, leading to chronic tightness and pain.
The fix: Use your pack's chest strap. A snug chest strap prevents shoulder straps from pulling your shoulders forward and down. Do shoulder mobility work off the ruck: band pull-aparts, reverse pec flyes, and upper back strengthening. Check your posture every 5 minutes during a ruck - shoulders back and down. If you find your shoulders still rounding, reduce your load or shorten your ruck distance until your strength catches up.
Mistake 4: Gripping the straps
The cause: Your pack feels heavy and unstable, so your instinct is to grab the shoulder straps and hold on. This makes you feel more in control. It's a natural protective mechanism when dealing with something unfamiliar and heavy.
The consequence: Hand numbness and restricted arm swing. Gripping the straps compresses nerves in your hands, reducing blood flow and causing tingling or numbness. It also prevents your arms from swinging, which reduces your natural balance. The pack actually becomes more unstable when you grip it, not less.
The fix: Let your arms hang freely. Adjust your pack fit instead. A properly fitted pack sits high on your back with tight hip straps and a snug chest strap. Once it fits right, the pack stays in place without you holding it. Your arms should swing naturally. If you still get hand numbness after adjusting pack fit, try loosening your shoulder straps further or wearing a chest strap higher up.
Mistake 5: Looking down at your feet
The cause: On trails, you watch your feet to avoid obstacles. On pavement, you watch your feet out of habit or self-consciousness. Looking down feels more stable, even though it's not.
The consequence: Forward head posture and neck strain. When you look down, your head moves forward of your shoulders, creating a forward head posture. This increases strain on the muscles and joints in your neck. Over time, this becomes chronic neck pain. On trails, looking down also reduces your view of what's coming, making you more likely to miss obstacles and stumble.
The fix: Keep your eyes 15-20 feet ahead of you. On trails, scan ahead for obstacles instead of looking down at your immediate feet. Your peripheral vision is better than you think for tracking footing. Your eyes should be level or looking slightly forward. This naturally keeps your head aligned over your shoulders. If you're nervous about trail footing, practice at slower speeds on easier trails before increasing difficulty.
Form checklist: the 60-second self-assessment
Every 10 minutes during a ruck, run through this quick checklist. These seven questions take 60 seconds and will catch 95% of form issues before they become problems.
- Am I standing tall? Crown of head reaching up, eyes forward, not slouching?
- Is my lean from my ankles? Can I draw a straight line from head through hips to ankles? Or am I hinged at the waist?
- Are my shoulders down and back? Not shrugged up toward my ears?
- Am I overstriding? Are my feet landing under my hips or in front of them? Cadence around 120 steps per minute?
- Are my hands relaxed? Not gripping the pack straps? Arms swinging freely?
- Can I breathe through my nose? Can I hold a conversation? Am I breathing at a sustainable rhythm?
- Is the pack riding high and stable? Hip belt snug, shoulder straps secure, chest strap engaged?
If any answer is "no," make the adjustment. The earlier you catch form drift, the easier it is to correct.
How form changes with weight and terrain

Your form isn't static. It changes as load increases and as terrain changes. Understanding these adaptations prevents injury and maximizes efficiency.
Heavier loads require shorter strides, slower paces, and slightly more forward lean (but always from the ankles, never the waist). At 60+ pounds, your pace might drop to 2.0-2.5 mph, your stride shortens noticeably, and your core engagement needs to be higher to maintain neutral spine. This is all normal and correct. Don't fight the load. Let your body respond appropriately.
Uphill walking calls for a slight lean into the hill (still from the ankles), a further stride shortening, and increased arm swing. Some people find it helpful to use their arm swing to propel themselves uphill - this is one scenario where that's actually useful. Keep your core tight to prevent your hips from pushing backward. Your pace will slow significantly on hills, and that's expected.
Downhill walking is where people get injured. Slow down. Your knees absorb a lot of force going downhill, especially under load. Bend your knees slightly rather than locking them straight. Let your quads and glutes do the work of controlling your descent rather than using your knees as brakes. Small, controlled steps are safer than trying to maintain pace on the way down.
Trail walking requires eyes up but scanning ahead. Widen your stance slightly for stability - your feet should be hip-width apart rather than in a tight line. Engage your core and stabilizer muscles. Your pace will be slower than pavement because you're managing more variables. Trust your eyes and let your peripheral vision guide your feet placement.
Film yourself rucking from the side for 30 seconds. You will immediately spot issues you cannot feel. This is the single best form improvement tool available.
Want to lock in good form from the start? Most of the breakdowns above - waist hinge, rounded shoulders, the load sagging onto your lower back - begin with a pack that rides too low. The Beginner Starter Kit is built around a frame-sheet pack that sits high between your shoulder blades, plus a sensible starting load so you can hold tall posture for the whole ruck instead of collapsing into it by mile two.
Frequently asked questions
Five fundamentals: tall spine with a slight forward lean from the ankles (not the waist), midfoot heel-to-toe roll instead of heel-slamming, shorter stride than normal walking, natural arm swing with hands at your sides, and conversational-pace breathing through the nose. Most form problems trace back to one of these five basics.
Lower back pain almost always traces to posture, not load. The most common cause is leaning back at the hips to counter-balance the pack weight, which compresses the lumbar spine. Fix: stand tall with a slight forward lean from the ankles, engage your core throughout the ruck, and check that the pack sits high between your shoulder blades rather than sagging onto your lower back. If the pack rides low, your shoulder straps are too loose.
High and snug. The top of the pack should sit between your shoulder blades, with the bottom at or just above your waistline - never lower than your hips. A pack riding low pulls your shoulders backward, compresses the lumbar spine, and makes everything hurt. Tighten shoulder straps until the pack is firmly against your upper back, then add a sternum strap if your pack has one.
No. Rucking is walking with weight - the moment you start running, you've changed the activity. Run-rucking dramatically increases ground reaction force per step (3-5x baseline) and is the leading cause of stress fractures and tendon issues. The slower controlled cadence of walking is what makes rucking sustainable. Combine running with weight on separate days, not within the same session.
Conversational pace through the nose. If you can hold a casual conversation with someone next to you, your pace is correct. If you're mouth-breathing or gasping, you're going too fast or carrying too much weight. Nose-breathing also keeps you in zone 2, which is the optimal range for endurance adaptation and fat oxidation.
Heel-slamming. Beginners walk with the same heel-strike they use unloaded, but the added weight amplifies impact 30-40 percent. Fix: conscious midfoot landing with a smooth heel-to-toe roll - imagine you're trying to walk quietly. The second most common mistake is over-striding; shorter faster steps absorb load through more contacts and reduce per-step impact.